
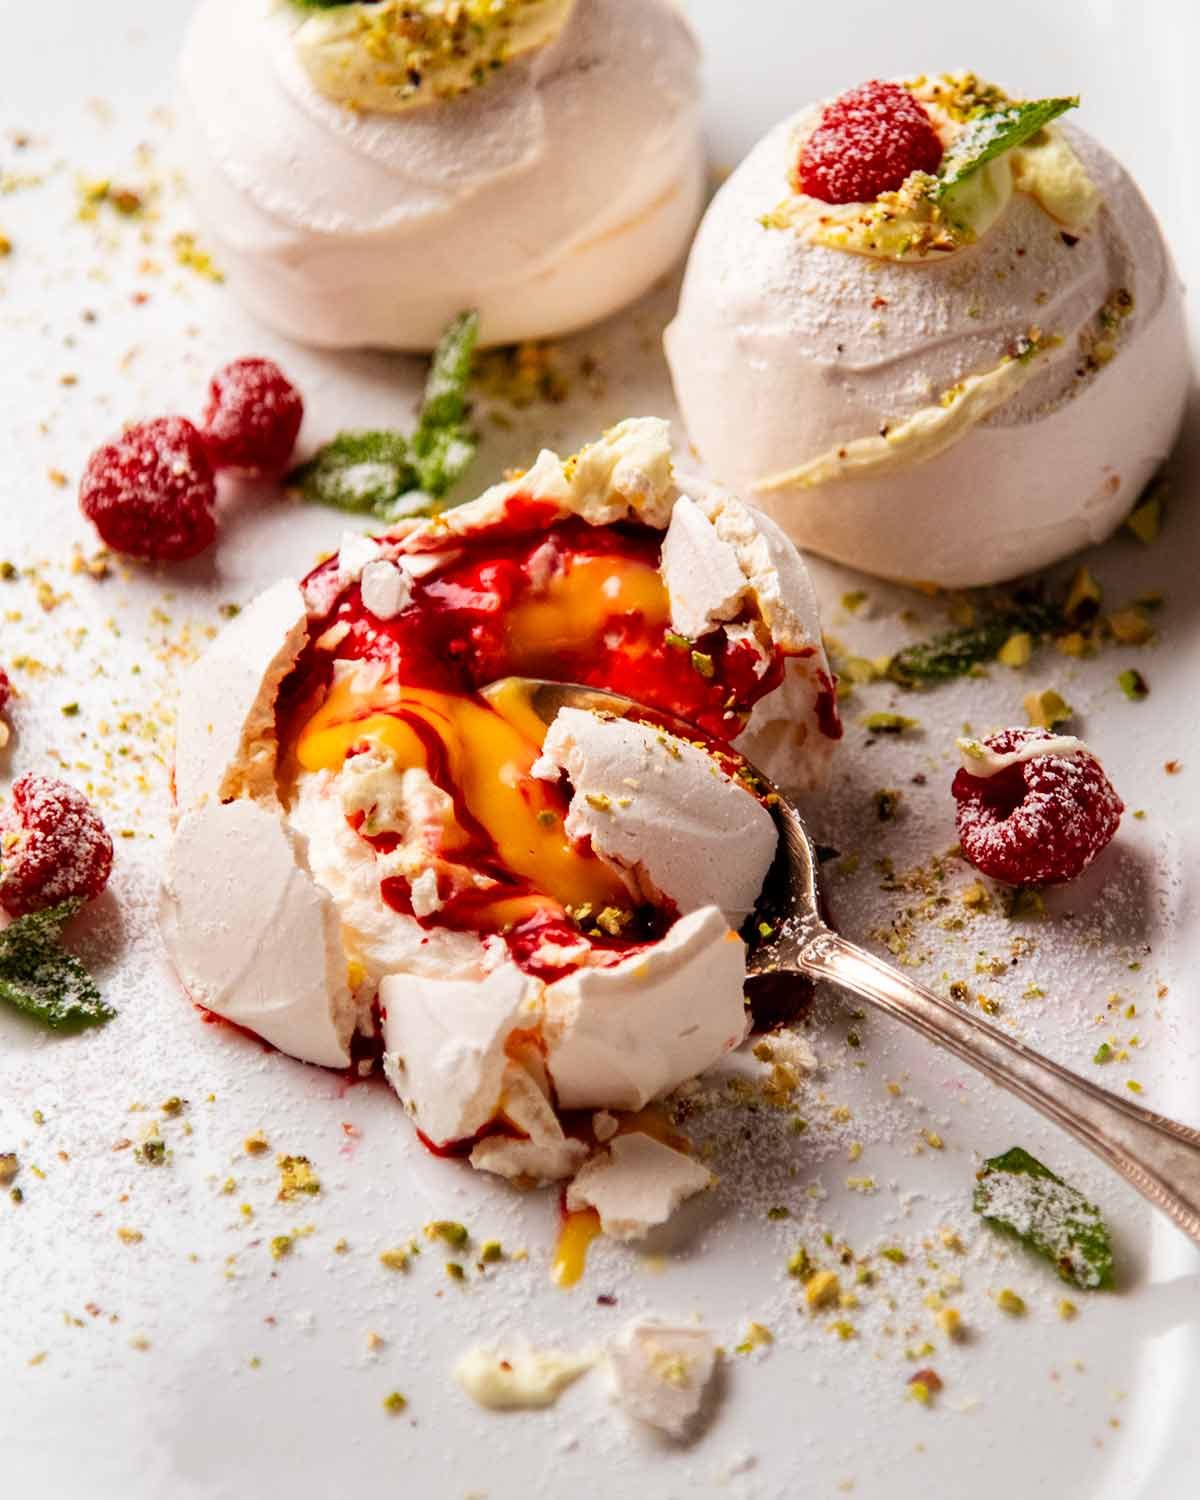
Pavlova Bombs are mini pavlovas balls filled with lemon curd, raspberry coulis and whipped cream. They look so innocent when placed before you – then they explode with colourful fillings when you smash into them! Shockingly easy – just poke a hole in the base, and fill. 🙂
Pavlova Bombs
I do love a good Pav! They are so iconically Aussie-Christmas. In years gone by, I’ve done a towering Christmas tree pav, Mini Pavlovas, and yup, even a regular one.
This year might be my best yet. Introducing – Pavlova Bombs!! Inspired by a pavlova ball I recently had at Bessie’s restaurant (rapidly becoming one of my favourite nice-restaurants in town), this is a pavlova that’s got hidden fillings inside. Imagine the wow factor when you smash the pavlova open!
The pavlova ball I had at Bessie’s was filled with elderflower strawberries. I chose Raspberry Coulis and Lemon Curd for visual impact (bright red streaks against yellow lemon curd looks so striking), and also because fruit + pav is my favourite thing ever. Using the leftover yolks from the pav in the lemon curd is also handy!
Look how innocent it looks before you smash it open….

No clue of the incredible filling inside!!!

What Pavlova Bombs taste like
Entertainment factor aside, the flavour and texture combination here is stellar. You’ve got the sugary meringue shell and marshmallow insides, then fruity berry tartness from the Raspberry Coulis and silky-smooth custardy tang from the lemon curd. Plus, whipped cream of course!!! Is it really a Pav without whipped cream??
You can fill it with anything that can be poured or stuffed inside: passionfruit pulp, mango puree, chopped berries, chocolate syrup, salted caramel… CAN YOU IMAGINE!
As impressive as they look, they are surprisingly straightforward to make. You just shape the pavlova into a dome shape, punch a hole in the base and fill using a piping bag or just pour in the hole. Then plug the hole with cream, invert, and serve!

Ingredients for Pavlova Bombs
The Pavlova Bomb shells need to be started at least 5 hours before serving as they require 1 1/2 hours in the oven then 3 hours to cool in the turned off oven (to fully dry out and set). I typically make them the night before then leave them in the oven overnight while I sleep, then store in an airtight container until required.
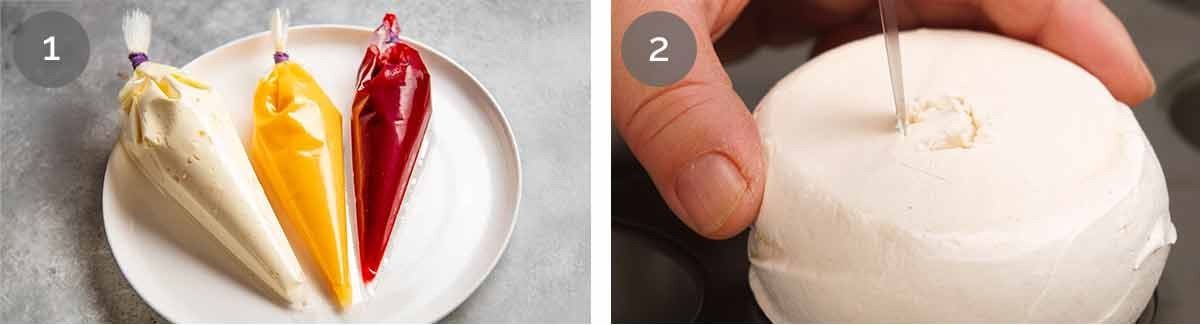
1. Ingredients for pavlova bombs
Here’s all you need to make the Pavlova Bombs shell:

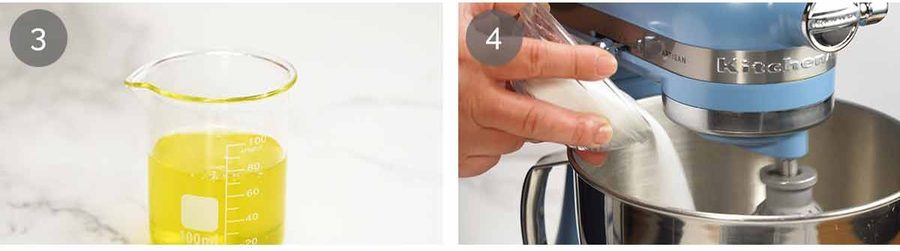
Egg whites – We need 80ml / 1/3 cup of egg whites which is approximately 3 to 4 large eggs. Using the right amount for Pavs really matters, given it is the key ingredient, so we need to measure rather than relying on “3 eggs”. Unfortunately chickens are extremely selfish and they don’t lay exactly the same size eggs every time. The nerve!! 🤣
Caster sugar (superfine sugar) – This is finer grains than regular white sugar so it dissolves more easily. Usually I say it’s ok to use regular white sugar but for pavs, I highly recommend using caster sugar because if the sugar doesn’t dissolve fully, you end up with sugar crystals on the edges.
Cornflour (cornstarch) and vinegar helps make the pavlova more structurally stable and strong so it won’t crack or collapse which is a common problem with a large traditional pavlova. Though less of a risk with mini ones, why risk it when we can take this easy precautionary measure? 🙂
* Sweetness note – The recipe uses 125g sugar (2/3 cup) for 3 egg whites, which serves 5. It may sound like a lot, but please don’t reduce it. Pavlovas and meringues need enough sugar to bake into a dry, crisp shell. Reduce it and the shell becomes fragile and prone to weeping. I’ve tested this extensively and this is the minimum amount that works. Pavs are sweet, but because they’re light and served with fruit and barely-sweetened cream, they never feel heavy.
2. pavlova bomb fillings
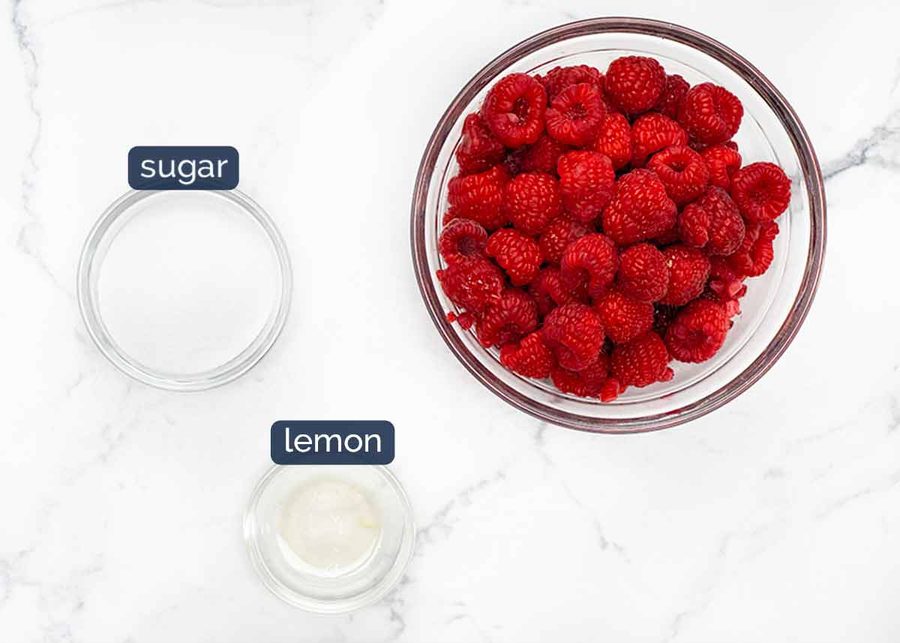
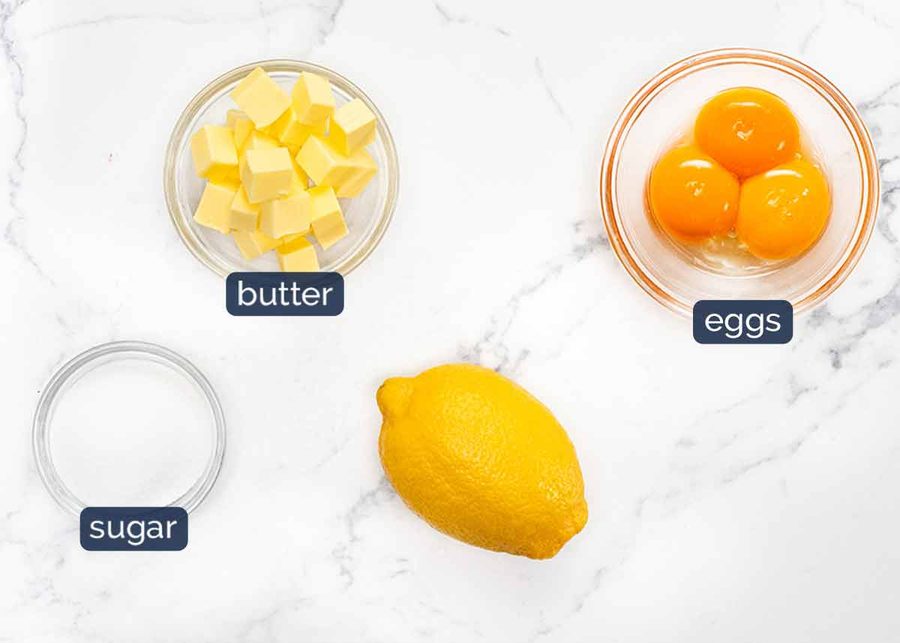
I filled these Pavlova Bombs with Lemon Curd and Raspberry Coulis, both of which balance the sugary shell with tang and berry brightness and bring traditional Pav fruitiness to this dish. Plus cream, of course! It is not a Pavlova without the presence of cream!

I’ve written up the Lemon Curd and Raspberry Coulis recipes in separate posts because they are things you’ll use far beyond this recipe. Here they are – the Raspberry Coulis and Lemon Curd. The coulis recipe also includes my cheeky shortcut coulis which I make using jam thinned with lemon juice. Because I don’t always have raspberries but I always have jam! 🙂
Here are the ingredient photos, so you can see at a glance how few ingredients are required:
Other filling ideas
You don’t have to use raspberry coulis and lemon curd! You can use anything that can be piped, poured or stuffed into a 1.25 cm / 1/2″ hole. Here are some ideas:
Passionfruit pulp – so very Aussie pavlova!
Mango puree – literally, just puree mango flesh. Excellent thick oozing consistency!)
Chopped berries, cherries or other soft fruit – small enough to shove through the hole. You could also macerate the strawberries in a little sugar to soften and get some juice.
Chocolate sauce, caramel sauce or any other sauce you desire!
Pecan Toffee Crumble (from this recipe) or any other candied nuts, praline etc.
Chopped nuts, dried fruit (glace cherries!)

My Pavlova Bomb workflow – and preparing ahead
I have been making the pavlova bomb shells the night before then leaving them overnight in the turned off oven. I make the Raspberry Coulis and Lemon Curd while the Pavlova is in the oven then leave them in piping bags overnight, ready to fill the Pav shells. I also whip the cream the day before and leave that in a piping bag. I stabilise it using Cream Stabiliser so it doesn’t weep or deflate – see Stabilised Whipped Cream recipe.
Then I have the garnishes ready to go – pistachios chopped, mint sprigs picked, extra raspberries. You can even puncture the holes in the pavlova ahead of time.
Then it’s just a matter of filling and plating. The piping bag is my best friend for assembling things with speed!
How to make Pavlova Bombs
Much more straightforward than you might imagine! For one thing, small pavlovas are easier to make and handle than a single large one, and far less fragile. Also, the meringue fluff is sturdier than you think, so don’t be afraid to shape it into balls. You can push, smear and reshape as needed, and the fluff won’t deflate.
1. How to make the Pavlova Bomb Shells
Key tips – separate the eggs and whites while the eggs are fridge cold (it’s easier). Measure the whites by volume (we need 1/3 cup / 80 ml). And take the fridge chill out of whites before beating as they fluff better when they are not fridge cold!
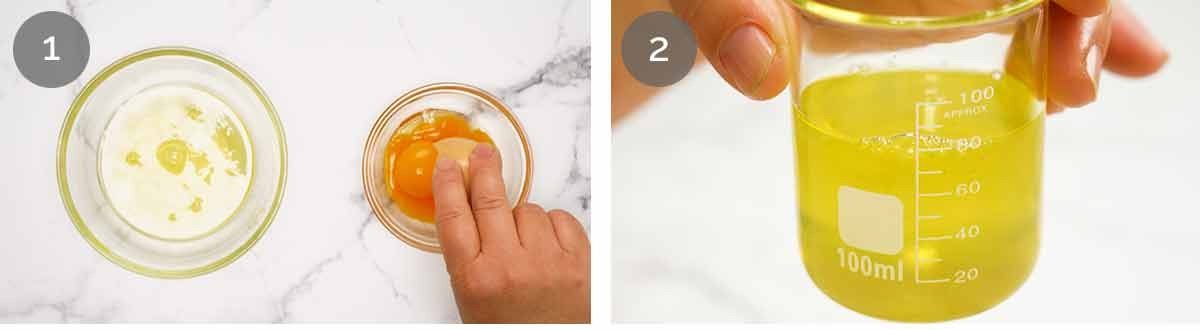
Separate yolks and whites while the eggs are fridge cold. Set yolks aside – we need them for the curd.
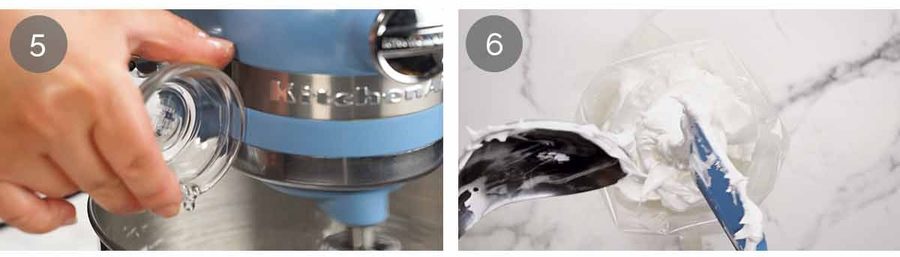
Measure out 80ml (1/3 cup) egg whites (it’s ok if you’re ~10ml / 2 teaspoons short / over). Leave the egg whites for 15 minutes before whipping, to take the fridge-chill out of them (will whip better).
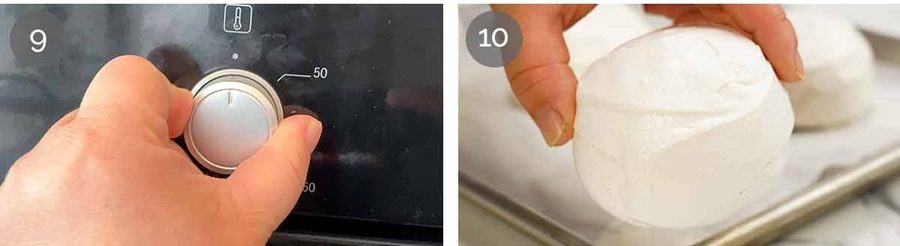
Gradually add sugar – In a stand mixer fitted with a whisk or handheld beater, beat the egg whites for 1 minute on high speed until soft peaks form. (I use speed 8 of 10 on my KitchenAid). Then with the beater still running, gradually add the sugar over 30 seconds. This keeps the whites more aerated and ensures the sugar dissolves properly.
Vinegar & cornflour – Beat 5 minutes on speed 10. The whites will become thick and glossy, and when you rub between your fingers there should be no sugar grit remaining. If there is, keep beating. Add the vinegar and cornflour then beat for a further 30 seconds.
Piping bag – Transfer the meringue mixture in a piping bag and snip off a large 1.5cm / 0.6″ opening. (You could also just dollop mounds using a large spoon).

Mounds – Dab a bit of meringue in the corners of a tray (stops paper from sliding) then line the tray with baking paper (parchment paper). Pipe 5 mounds on the tray, then smooth into domes that are taller than they are wide (they flatten slightly when baked). Mine are about 4 cm / 1.6″ wide and 6.5cm /2.6″ tall. Don’t fret about making the surface smooth, it gets decorated later, no one will notice a few bumps and smears!
Bake 1 hour 30 minutes at 110°C/225°F (100°C fan-forced) or until the base is crisp and dry to touch. If it is still sticky, keep baking.
Cool in the oven – Turn the oven off and leave the pav bombs in the closed oven for 3 hours, or even overnight (I usually do this). This step is super important for Pav stability – gradual cooling of the oven and stabilising the fragile meringue shell without overcooking it, going brown or taking it so far the marshmallow centre dries out (travesty!).
Store in airtight containers until required. It’s best to use within 24 hours of baking them but they are still 95% as great on day 2 (marshmallow inside deflates a bit).
EXTRA MERINGUE MAKING TIPS!
Fresher eggs work better, they fluff more. If using freshly laid eggs (for those of you who happen to have chickens in your yard), you’ll need to beat for a couple of extra minutes to get volume as the whites are so tight. 4 – 5 day old eggs are ideal (that’s “fresh”, in shops!).
Separate eggs one at a time if you’re new to it. This way, you won’t ruin the whole batch if you accidentally get some yolks into the whites. Egg whites tainted with even a drop of egg yolk won’t fluff up properly.
Whip at room temperature – While eggs separate better when cold, they fluff up when they are not fridge cold. So after measuring out the egg whites, leave it on the counter while you prepare the other ingredients, tray etc.
Clean bowls – Make sure your bowl and whisk is clean and dry. Pavs are finicky things and don’t like grease or water, it will prevent the egg whites from fluffing properly.

2. How to FILL THE PAVLOVA BOMBS
OK! This is the fun part. Well, other than smashing it. Oh, and eating it!! This is a dessert that scores high for every aspect – making, smashing, eating!
Piping bags – Transfer the chilled raspberry coulis, lemon curd and whipped cream into separate piping bags. Snip a small hole from the end of the coulis and lemon curd bags (~3 – 4 mm) and a larger hole for the cream bag (~1cm / 0.4″ wide). No piping bag? That’s ok, you can pour the coulis and curd in, and use a spoon to smear the cream. A piping bag just makes fast work of the filling part. 🙂
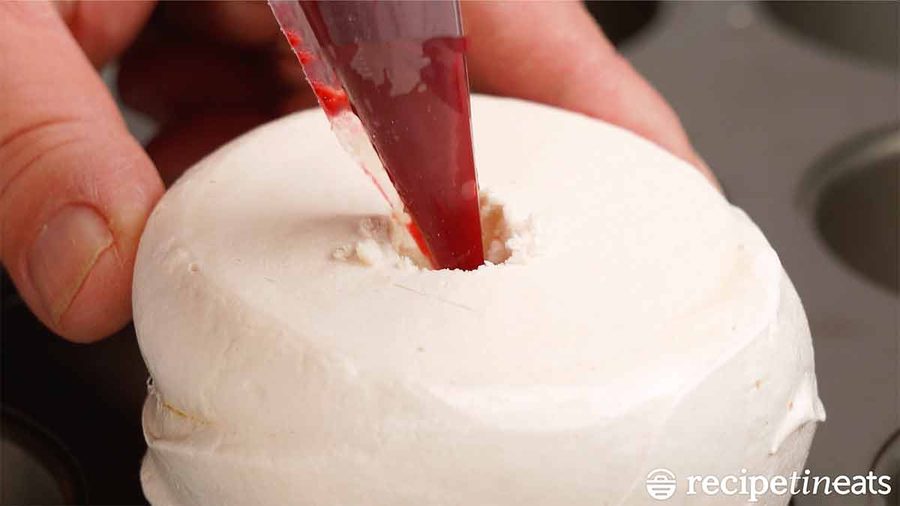
Hole – Using a small sharp knife, cut a 1.25cm / 1/2″ hole in the base of the pav. I put the pav bombs in a muffin tin which keeps them safe and stable while I fill them.
Why not put a hole in the top, which would be easier? Because the shell is more fragile than the flat base. High risk of the shell caving in when you cut or puncture a hole. I tried!
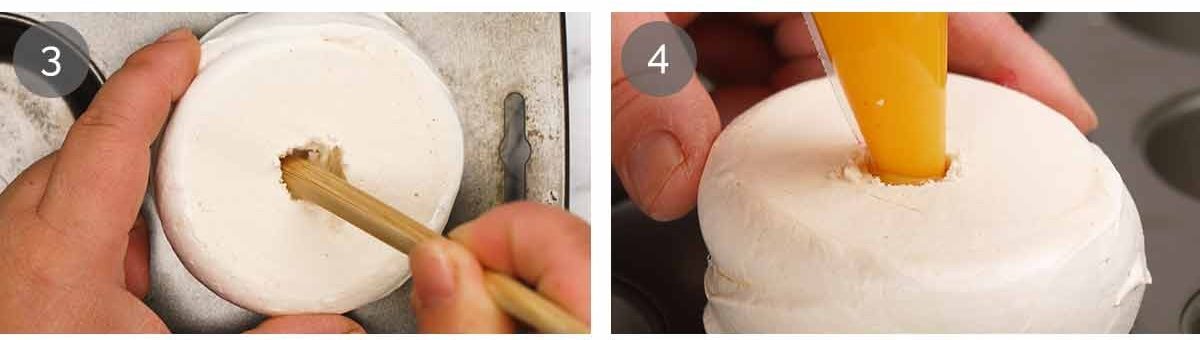
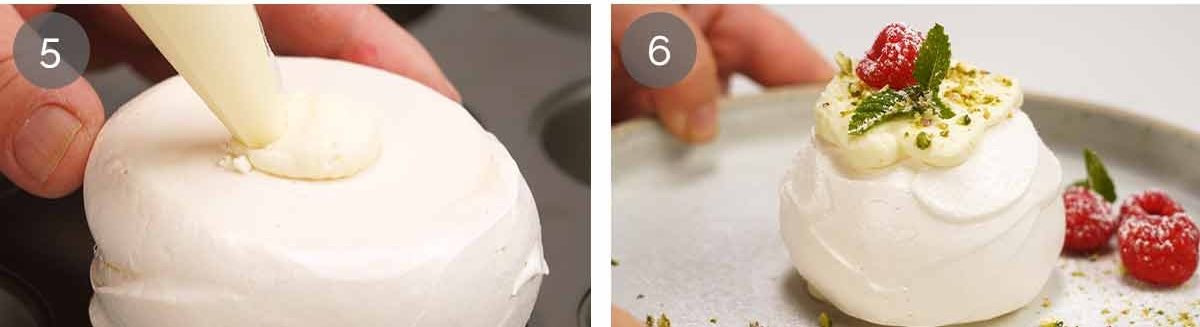
Make space – Stick a chopstick in and jiggle it around slightly to make room for the fillings.
Fill – Working one pav at a time, pipe some raspberry coulis in first (about 1 1/2 teaspoons), then lemon curd (about 2 – 2 1/2 teaspoons).
TIP – Don’t overfill; too much weight or liquid will break or dissolve the delicate shell. Fill one Pavlova Bomb at a time because the meringue softens quickly. Once you flip it upright you’re safe – no risk of the filling damaging the presentation surface. 🙂
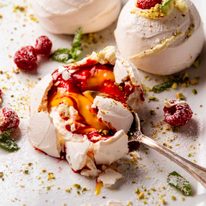
Plug the hole with cream.
Plate up – Pipe a bed of cream on a plate, a nice amount for eating with the pav. It also stops the pav bomb from sliding around when you cut into it. Carefully place the pav bomb on the cream, hole side down. Smear some more cream on the surface, sprinkle with pistachio nuts, top with a raspberry, mint, then dust with icing sugar. Serve!!

These Pavlova Bombs plate up beautifully as individual desserts, or you can put out a platter of them for everyone to help themselves. Carefully! This is not a dessert to be grabbed with enthusiastic hands – can you imagine?? They’d explode like…..well bombs! 💥
If doing the latter (ie platter form), don’t put the pavs on extra cream because it will soften the shell of the meringue so when you pick it up, all the fillings will pour out through the base. How do you think I know that??! 🤣 It happened at around the 20 minute mark when I was faffing around in the shoot room.

Broken pav = Eton Mess!
And before I sign off, one last thought. Yes, the Pav Bomb shells are a little delicate. Yes, my elephant fingers have cracked a couple over the past few batches.
If it’s just a minor crack, just hide it with cream.
If it’s a little more dramatic and not salvageable, do the obligatory gasp, stamp your foot, wail… then scoop it all up (use a spatula to keep it together as best you can), and scrape it into a cocktail glass. Present it proudly as an Eton Mess! I mean, it’s just a deconstructed Pavlova! – Nagi x
PS. Question – who gets the Eton Mess while everyone else gets a perfect white sphere? 🤣
PPS. For those new to Eton Mess, it is a real dessert of crumbled meringue piled into a dish with cream, curd, coulis, all the good things. It’s so pretty, and my friends tell me it’s a standout of all the desserts I’ve made them over the years!
Watch how to make it
Hungry for more? Subscribe to my newsletter and follow along on Facebook, Pinterest and Instagram for all of the latest updates.
Pavlova Bombs
Ingredients
Pavlova Balls:
- 80 ml / 1/3 cup egg whites , from 3 large eggs (Note 1)
- 2/3 cups caster sugar (superfine sugar), do not cut down, it will affect result!
- 1 1/4 tsp cornflour / cornstarch (Note 2)
- 1/2 tsp white vinegar (Note 2)
Fillings
- Raspberry Coulis
- Lemon Curd (uses the 3 leftover yolks from the Pav)
- (See in post for other options – passionfruit pulp, pureed mango, chopped up fruit, chocolate sauce!)
Whipped cream:
- 1 cup heavy/thickened cream (or any other whipping cream), COLD
- 1 1/2 tbsp caster sugar / superfine sugar
- 1/2 tsp vanilla extract
- Option to stabilise so you can whip cream day before – see here for how (Note 3)
Garnishes
- 1 1/2 tbsp unsalted pistachios , finely chopped
- 5 mint sprigs , small
- 20 raspberries
- Icing sugar / powdered sugar , for dusting
Instructions
ABBREVIATED RECIPE:
- Pipe then shape meringues into 5 domes. Bake 1 1/2 hours at 110°C/225°F (100°C fan), cool 3 hours / overnight in oven. Cut small hole in Pav bomb base, squidge around with chopstick to make room for fillings. Fill with coulis then curd, plug hole with cream. Decorate, SMASH!
FULL RECIPE:
Pavlova bombs:
- Preheat oven to 150°C / 325°F (all oven types).
- Egg whites – Separate the egg yolks from egg whites while fridge cold (it's easier). Measure out 1/3 cup (80 ml) egg whites then set aside to come to room temperature for 15 minutes (fluffs better at room temp).
- Add sugar – In a stand mixer or using an electric beater, beat the egg whites on high for 1 minute. While still beating, slowly pour the sugar in over 1 minute.
- Beat 5 minutes – Continue to beat for 5 minutes on high until it's fluffy, glossy, and there are no sugar grains remaining when you rub a bit between your fingers. Add vinegar and cornflour then beat for a further 30 seconds.
- Line tray – Dab a bit on the corner of 2 trays then cover with baking paper (parchment).
- Pipe mounds Transfer meringue mixture into a large piping bag. Snip the end to make a large 2cm / 0.8" hold. Pipe 5 mounds on the tray, then smooth into domes that are taller than they are wide (they flatten slightly when baked). Mine are about 4 cm / 1.6" wide and 6.5cm /2.6" tall. Use a small offset spatula or butter knife to smooth into a dome shape (no need to be perfect, it gets decorated later).
- Bake 1 hour 30 minutes – Place both trays in the oven, immediately turn oven DOWN to 110°C/225°F (100°C fan) and bake for 1 hour 30 minutes or until they are dry to touch (check base). Keep baking if still sticky – exact times may vary. (Note 4)
- Cool in oven – Turn oven OFF and leave to fully cool for 3 hours or overnight around 10 hours (I often do this while I sleep so handy!).
Fillings:
- Make the Lemon Curd and Raspberry Coulis while the pavlovas are in the oven. Very easy – simmer to thicken, strain, then chill before using.
- Whipped cream – Beat cream ingredients in a large bowl on high until soft peaks form (45 seconds using a stand mixer, 1 – 1 1/2 minutes with hand held beater). Do this just prior to serving, unless you stabilise the cream (which can be done the day before). Note: if making stabilised whipped cream, follow the steps for your chosen method (there's multiple ways to do it).
Assemble Pavlova Bombs:
- Piping bags – Transfer the raspberry coulis, lemon curd and cream into separate piping bags. Snip a small 5 mm / 1/5" off the end of the raspberry coulis, and a larger 1cm / 0.4" off the cream piping bag. (No piping bag? See Note 5)
- Access hole! Place a pavlova bomb upside down in a muffin tin, to hold in place as you work. Carefully cut a 1cm / 0.4" hole in the middle using a small sharp knife. Stick a chopstick into the hole and squidge around GENTLY to move some pavlova marshmallow centre out of the way to make room for the fillings.
- Pipe some raspberry coulis in (~ 1 1/2 tsp), then lemon curd (~ 2 – 3 tsp). Plug the hole with cream.
- Plate up – Pipe ~2 tbsp cream on a plate, top with pavlova bomb (stops it from sliding). Pipe then spread more cream on the top of the pavlova bomb. Top with a raspberry, mint sprig, sprinkle of pistachio, dust with icing sugar.
- Smash! Serve immediately – pavs don't wait around once assembled! Encourage everyone to smash into their Pavlova Bombs so you get a bit of everything in your first bite – delicate crispy meringue, marshmallow centre, tangy lemon curd, bright raspberry coulis. SWOON!
Recipe Notes:
1. Egg Whites:
- Measure out the egg whites until you have 1/3 cup (80 ml), usually 3 eggs. Why measures? Because it turns out not all eggs are the same size…. So annoying right? Someone needs to have a talk to chickens! 😂
- Separate the egg whites from the yolks while fridge cold (it’s easier to do than with warm eggs)
- Leave whites for 15 minutes to take out the fridge chill, cold eggs don’t fluff as well.
- DO NOT use carton egg whites – it doesn’t fluff up nearly as well
Life of Dozer
Not even going to try to sugar coat it – I had a vision for an adorable Dozer Christmas photo and it was a total, utter fail. 😂

Nagi Maehashi, These Pavlova Bombs look absolutely incredible! I love desserts that have a surprise filling inside, and the raspberry coulis with lemon curd sounds like the perfect balance of sweet and tangy. The presentation is beautiful too. I’m definitely saving this recipe to try soon. While browsing food ideas earlier I also checked the Wendy’s menu to plan a quick dinner before making dessert at home. Thanks for sharing such a creative recipe!
Oh boy, these are so good, they are easy to make and really impressive to serve but the taste with the raspberry and lemon curd is out of this world
I’m so pleased withr outcome. My posted it in my fb….so much good feedback. Thank you for your recepi.
Made this for Xmas day, delicious will definitely be making again.Thank you for sharing 😋
Made these for the family and they were easy to make and most impressive. My only mistake was not putting enough filling in but that was easily rectified. 10/10 from this family and bonus is you make everything the day before and just assemble when wanted.
I did these with shop bought lemon curd (good stuff LOL) and raspberry coulis sold in a pouch from Coles as I was strapped for time.
It was amazing and no trouble for a Christmas dessert. The meringue’s were just gorgeous!
Ohh Nagi ! These were AMAZING and they worked out perfectly (I was pretty chuffed with how my Meringues came out too!). i used a chopstick to make the hole and moved it around a bit to make sure it was slightly bigger to squeeze in the coulis. I found the lemon curd too sweet for my liking (probs went overboard), so next time, I will replace it with mango coulis. This was such a show stopper and will definitely make again. X
My daughter wanted to make this as a Christmas dessert and and trials sessions multiple times. We just could get the pavlova’s right. They’d crack, or be completely solid on the inside. Eventually she made merengue baskets and filled those. Still delicious`!
Nagi, Happy New Year! Made these delicious bombs for Christmas Day, they were great!
Had difficulty filling them with enough filling to fulfill the bomb effect!
They were very crispy inside and difficult to make room for the filling. What did I do wrong?
I made these for two get togethers during the holidays. I made the Pavlovas, let them cool per the recipe, and cut the holes in the bottom. I made the raspberry sauce, lemon curd, and stabilized whipped cream and left them in the pastry bags. We made a desser station at each party, and everyone made their own Pavlova Bombs. Everyone had a blast and loved the flavors. It was so much fun, a friend asked me to make them for a birthday party for her adult daughter just before Christmas. Plenty of steps to making these, but nothing is hard to do. So pretty, so delicious, and so much fun! Thanks for the great recipe.
I just made the Pavlova bombs for the family New Year lunch and they were a huge hit! Very easy to make, light and look like a million bucks! The only complaint from the family – no seconds 😂. Thank you, Nagi, for another foolproof pavlova recipe!
I made these 2.5 times the recipe for 12 people for New Years Eve last night. They were fabulous.
Hi Nicola, may I ask if you made a double recipe for lemon curd and raspberry coulis as well, or was a single recipe of each enough for the 12 you made? Thanks in advance 🤗
These turned out amazingly! The pavlova bombs tasted better than they look – if you can believe it! They were an instant hit with our guests. Thank you once again for another foolproof recipe!
These sound so interesting! I’ve never heard of something like this — what a truly unique dessert! So pretty and memorable.
Thanks for this wonderful recipe! Doubled it for Christmas Day, it was a hit.
I have 2 questions, the inside of the pavlova was crispy, not marshmallow like. What did I do wrong. Raspberry Coulis was quite runny, difficult to use piping bag, needed 3 hands which I luckily had available!
Love all of your recipes! Hugs to you and Dozer. Hope you have a Happy New Year
I made these for our Christmas lunch in the Netherlands.
I loved the gasp of delight when my guests came to the table and saw the beautiful presentation, but then the bigger surprise of the fillings once they dug in.
As I never really bake recipes that need piping bags, I stored the curd and coulis in sealed zip lock bags in the fridge overnight so when it came time to assemble, all I had to do was snip off the tip of the corner and pipe away, they came together surprisingly quickly.
Will definitely make these again, thanks for the gorgeous recipe!
Really fun to make and eat — wound up with a bit of Eton Mess leftover for later but it won’t go to waste! The pistachio dust was such a nice touch. Only comment is I wouldn’t pipe the meringue next time, I am not adept enough with the meringue and wasted a lot. Worked super well for the curd and coulis though.
Oh my these were amazing and the hit for our Christmas lunch. Nagi your recipes and instructions are so easy to follow. Thank you xx
Very easy to make and assemble and a real crowd pleaser. Tje tang of the lemon curd and raspberry coulis offsets the sweet meringue perfectly and the nuts bring added crunch. I will definitely be making them again!
Very late to be asking this question, but is there any reason why I can’t double the recipe to make a bigger batch for Christmas lunch tomorrow? I am so excited to make these! They look amazing!
My uncooked Pavlovas collapsed while I was trying to shape them.
I think my little Kenwood beaters weren’t able to beat in enough air